Pages

Thursday, April 21, 2011

I Bought a Blue Dress Yesterday

I hadn't planned to go shopping, but I hadn't planned to spend my morning at the funeral home either, taking care of my Dad's memorial service.

When Dad was diagnosed a few weeks ago, I thought I'd have more time with him. Time to make sure he knew that I couldn't have had a better Dad. That I couldn't have had a better role model. Time to make sure he knew how very much I loved him.

The call on Tuesday morning summoning us to the hospital came as a horrible surprise. He'd been so sick from his chemo treatment, but had been improving, so we never expected to have to say goodbye so soon.

But I see God's hand in it all and in His infinite mercy, He spared my Dad any more suffering and brought him home to heaven. He's now healed and free and happy and that gives me peace. Dad didn't want us to "go around with long faces", yes, his words; but he wanted us to celebrate with him that he was free. His memorial service will be a celebration of his life. He wanted to be remembered for the life he lived and loved.

So, I bought a blue dress yesterday. Blue was my Dad's favorite color and the color of his eyes and I'll wear it proudly to honor this amazing man who shaped my life and taught me how to live it. Fully and without regret.

I love you Daddy.
~~Robin

Celebration Service for Robert Saunders, Jr.Link

Thursday, April 14, 2011

Questions about my Butterfly Album

Hey stampers,

I got a ton of questions about sizes, etc. today for my Butterfly Album (post HERE). Since I have to go back to the hospital in Richmond tomorrow, I won't have time to post photos of the steps, but here are the measurements and some instructions. The photos of my finished project on the first post should make this self-explanatory, it's really a simple template and you decorate it anyway you like!

The cover is a piece of 6" x 12" cardstock scored at 5 7/8" and again at 6 1/8". This creates the spine of the album.

The DSP on the spine is cut at 3" x 6" and is scored at 1 3/8" and again at 1 5/8".

The inside cardstock "pages" are one piece of 10" x 10" cardstock. It's scored at 5", then turned and scored again at 5" so you have 4 sections.
Next, you cut one of the score lines up to the middle of the cardstock. This cut allows you to fold your album pages.
Important - one thing that I do differently is after I make that cut, I leave the cardstock in the cutter, but shift it over about 1/16" and make another cut back out to the edge alongside the first one. It cuts out a tiny sliver of cardstock and makes your pages much easier to fold up.

I decorate all my "pages" before adhering it to the decorated album cover, it's much easier to handle this wey. All my DSP panels are cut at 4 3/4" square and I add embellishments of paper strips, ribbon, etc. on top of them after adhering them to the pages.
Our original directions from Founder's Circle had us using Sticky Strip, but I actually use Tombow Multi-Adhesive to glue it all together. I've just found it works better for me in my humid area.

So, I think that's pretty much it - like I said, it's a very easy project and even with the cutting should only take about 1/2 hour or so to put together once you know what design you want to do. Have fun with it and I'd love to see what you make! :)

Stamped blessings,
Robin

Butterflies for Spring!

Good morning stamping friends!
I've been away from the ol' blog since Monday and I'm sorry for leaving you hanging. But, my Dad has been in the hospital since Monday with heart complications from his Chemotherapy. They have him stabilized in CCU right now, but he's been a pretty hurt puppy really since last Saturday. Please keep him in your prayers - I know you will, you all have been so wonderful with encouragement and support since his cancer diagnosis. I can't tell you what it means to know we have friends praying for us from all over the world. My Dad even mentioned it yesterday, that he couldn't believe so many who didn't even know him would be praying for him. It's an awesome thing!

So, today I'm spending the day in the studio trying to play catch up on many things - plus, I have my fun stamp camp - Stampin' at the Firehouse tonight at 7 pm! There is still room for a few more if you want to come stamp with us. All the deets are on my events page, just click the link at the left on my sidebar.

Edited 4/14 - Post with Measurements/instructions is HERE.
The project I'm sharing today is one that I made for my party hostess, Lynn, last Saturday. We had a great time at her Stampin' party and I always like to make something unique just for my special hostess. Here's a photo of the front:

No, it's not a card - it's a mini scrapbook album! Doesn't it make you long for Spring to get here in earnest?!~ I know it does me!
We got the original idea for this album at Founder's Circle 3 years ago, which just goes to show that a good idea is always a good idea, no matter how old it is. The original album used the stamp set Simple Friendship and some coordinating DSP. My album actually has NO stamping at all! I know, get out!! But, I did have some fun with my Big Shot making the cover pieces. I used the Beautiful Butterflies Die and the Square Lattice Die.
Here's a photo of the cover opened up:

My color combo came from the Greenhouse Gala DSP - yes, it really is one of my favorite packs of DSP. You can get so many varied looks from just one package. Did you know that all the colors in this DSP can be found in the Getting Started Cardstock and Ink Spots collection? Yep, it's a great way for new stampers to get started with a nice variety of coordinating colors.
Here's a photo of the "pages" opened up halfway:

This is not a complicated album at all to create - in fact, I think I finished this one in just 1/2 hour. That included cutting all the cardstock and paper.
Here's one more photo of it opened up all the way:

I think my flash didn't go off for this photo, sorry, but since I gave it away, I can't retake it! :)
I kept the embellishments simple since I didn't know what Lynn would do with her gift, but the ones I did use were some of my favorites. Buttons from the Sew Suite Big Buttons, Linen thread, Daffodil Delight 5/8" Grosgrain, Pear Pizazz Seam Binding and those yummy self-adhesive Pearls!

Thanks for stopping by to visit today - I plan to have a project up for you tomorrow as well, so come back and check it out, ok?
Stamped blessings,
~~Robin

Monday, April 11, 2011

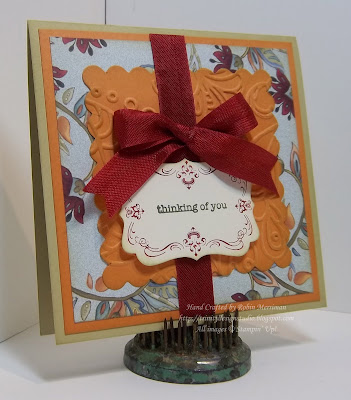
Framed Thoughts

Happy Monday stampers!

I've got a fun, new card to show you today and since I have a class starting in about 3o minutes, I'd better get right to it, eh? (That sounds very Canadian, eh?!)
Well, that's because the layout for this card was inspired by an absolutely gorgeous Christmas card that I received this year from my friend Karen Duke. Karen and I serve on the Advisory Board together and I just LOVE her - she is such a dear! I love to listen to her talk because she has the sweetest lilt in her voice with that distinctive Canadian flavor, eh? :)

Anyway, here is the card I created:

I've used the lovely new Paisley Prints DSP and the Four Frames stamp set that are the Sneak Peek special going on the whole month of April. The paper is simply gorgeous and has so many different colors, patterns and styles in it, you'll be coming up with a zillion ideas! The stamp set has a ton of versatility, which I love. It's always good to own a stamp set that can give you many design choices and this one certainly fits the bill.

My card base is River Rock, layered with Peach Parfait, then a piece of that beautiful DSP. Next, I cut a Scalloped Square out of Peach Parfait with my Big Shot and the Scallop Squares Duo Die. Then I ran it through the Big Shot again and embossed it with the Elegant Lines embossing folder. It's rubbed with a bit of River Rock ink to bring out the embossing.

The greeting was stamped from Teeny Tiny Wishes in Always Artichoke ink inside the frame that I'd stamped with Cherry Cobbler ink. It was punched out with the Decorative Label punch and mounted with Stampin' Dimensionals to make it pop up. I've added Cherry Cobbler Seam Binding for my bow to finish it off.

There's a lot going on with this card, but I love the mix of colors - ones that I wouldn't have put together without the prompting of that DSP - but they look great together!

Here's a photo of Karen's Christmas card:

Isn't it pretty? Now you see why I had to case that layout! Gorgeous!

I hope you all have a wonderful day - take some time to stamp something pretty - it will make you smile, I promise!
Stamped blessings,
~~Robin

Friday, April 8, 2011

A Touch of Poppy

Happy Friday stampers!

I hope you've all had a good week and have some fun plans for your weekend. Ours is pretty full - I know, what's new? - but it's all good! I'm really looking forward to getting our box garden cleaned out and replanted. We started one a few years ago when Emma decided she wanted to plant something. And unlike a lot of kid projects that become Mom and Dad projects, she actually tends it with us each year. We've enjoyed experimenting with different plants - the cantaloupe and tabasco peppers were epic fails - but our banana peppers and cherry tomatoes can't be beat! The best part is being able to just go in the back yard and pick fresh veggies for our dinner - awesome! So, if you have any good suggestions for new stuff to try, let me know, we're always up for an experiment!

So yesterday, I sat down to stamp and that gorgeous hydrangea stamp from Because I Care was still sitting out on my table. Between that and all that thinking about the garden led me to create this card:

and it just made my heart happy when I saw the end result! The combo of Pear Pizzazz and Poppy Parade just, well, worked! and I love it here!

Confession time - I have avoided the Poppy Parade In Color like the plague - in fact, I still have all three of my pre-order packs from last June. Every time I looked at it, I just thought "yukk!". But a couple of weeks ago, I was in Kohl's Department Store and bought a gorgeous short trench coat in that Poppy Parade color for the Alaska cruise. I couldn't believe I was buying something in that color, but girls, have you checked out the stores and fashion magazines this season? Poppy Parade is EVERYWHERE! Unavoidable! So I guess you could say that I've succumbed to the power of the Poppy. Like Dorothy in the Wizard of Oz. Oh Lord, I hope you get that reference!

Anyway, This card is pretty simple - Very Vanilla, Pear Pizzazz, Poppy Parade; combined with the First Edition DSP - which you MUST own! It's awesome paper!
You can pretty much tell what I did with this card by looking at it. But here's a few details for you.

I used the Scallop Trim Border Punch on the bottom edge of the DSP and it's sponged as well as all the other Vanilla and Pear layers.
The Pear Pizzazz Seam Binding is wrapped around the belly strip and then a second piece knotted around it with a small Vanilla Rosette flower attached with Mini Glue Dots.

I used the sneak peek stamp set Four Frames for the focal point - love this polka-dot frame! The greeting is from Because I Care and is simply stamped in the frame. I left enough room to add the small row of Pearls below it for a little bling. It's popped up on Stampin' Dimensionals above the ribbon.

And once again, I stamped a bit on the inside of the card too. Just a little love for the inside!

So, there you go - another card with that big ol' flower stamp, but an entirely different look - love it! Thanks for visiting today - I love to know you've been here, so leave me a comment and say hi, ok?

Stamped blessings,
~~Robin

Wednesday, April 6, 2011

A Promise Kept!

Well, it took me a little longer today than I expected, but I DID manage to get something pretty made to share with you! :)
I actually sat down at the table and tried to get my mojo going again by finishing up some left over cards from a class I had recently, but that wasn't inspiring me too much. Even been there? Yep, you probably all have! So I was like, what now? What to do, what to do........
So, my eye fell on a jar of Black Embossing Powder that was on the table and that was my starting point for this card:

I started wondering what could I emboss in black without being depressing? Music, of course! So, I grabbed my Music Notes wheel and my Wheel Guide (so I'd roll it straight!) and inked up the wheel with Versamark. I rolled it twice across a piece of Very Vanilla cardstock 4 1/4" x 11" that I'd rubbed with my Embossing Buddy - to prevent static which would put Black Embossing Powder in places that it didn't belong! No one wants that!

Next, I dumped the black powder over the stamped music notes (I could have told you I gently poured it over, but that would be lying because just about the whole container dumped out on my poor card when I was applying it! Sheesh!) Anyway, after tapping off the excess and embossing with my Heat Tool, I had some lovely black music notes. Now what to do with that?

Hmmm. I knew I didn't want this card to be masculine or depressing so I pulled out my Because I Care stamp set that hadn't seen ink in ages! I inked up the big, beautiful Hydrangea stamp with Crumb Cake and did some random stamping all over the card front with it. LOVE how that turned out! I also sponged the edges with Crumb Cake because, well, because I just had to, that's why. I dunno, just go with it.

So, what to do about color? I didn't want bright or somber, but something soft and warm, so I went with two greens - Pear Pizzazz from the Botanical Gazette DSP and Always Artichoke Seam Binding. I punched four scallops out of the green DSP with my 1 3/8" Scallop Circle Punch and crumpled them all up to age them a bit. Then I sprayed on a little Gold Smooch Spray - it's just not showing up well in the photos.

Here's a close up of the "flower" and the ribbon treatment:

I punched a hole in the four scallops and ran my ribbon through them from the back after I'd slipped it under the folded card front. I cinched it up and tied the bow on top of the "flower" so the ribbon would be pretty on the inside of the card too and not have unfinished ends. The Antique Brad presented a problem attaching it until I took a pair of wire cutters and snipped off the prongs. Ha! That'll teach it! It's stuck down with Mini-Glue Dots just like the little banner I stamped with Teeny Tiny Wishes.

And here, see - I even stamped a little on the inside of the card:

It was wonderful to sit down and create again from scratch! Hard getting started, but really great to create something that I love. And I do love this card. I'd also love to know what you think about it too, so leave me a comment and share, ok?

I'll be back tomorrow with something else pretty for you - don't know what yet, but I'll be back - I promise!

Stamped blessings,
~~Robin

An Update and a Promise

Good morning stamping friends!

I want to take a minute to say a huge THANK YOU to all of you for your support, prayers, encouragement and kindness in the past week since we got the news about my Dad. You have blessed me and comforted me more than you will ever know and I can't thank you enough for your beautiful hearts! So many of you have been through similar trials with loved ones and your words of encouragement just lifted me in amazing ways. You've said that you've been blessed by my strength and faith, but truly my friends - it's YOU who are blessing me!

I'm still a bit numb from it all, but it's getting better and I'm putting one foot in front of the other each day and maintaining 'normal' - such as it is - as best I can. One dear friend shared this truth with me "It may be a surprise to you, but it's no surprise to God." Knowing that and holding on to that truth keeps me sane - God is completely in control and He is walking right by our side during this trial. I was talking with Emma yesterday and asked her how she was doing and she shared this with me. She said "Mom, I cried really hard for the first time last night about Grandpa. I love him so much and I don't want him to die." I said, "Emma honey, I don't ever want you to cry alone, I wish you had come and gotten me." And here it is folks - she said "Mom, it was really late and you were in bed, and besides, I wasn't alone." Oh, how it blesses me to know that Emma feels the presence of God with her right now and knows that He's with her even in her darkest moments. That brings me such joy, I can't even express it. Don't we serve an awesome God?!

My Dad had his first chemo treatment yesterday and it went very well. In fact, the doctor has given us a slightly better estimate of his "time" which was a joy to hear from him. For those of you who are praying for him, please pray for the following things: 1) that he can handle the nausea that will happen due to the chemo and that it won't weaken his resolve to fight; 2) that he won't get an infection or illness during the chemo - the doctor said that is the most dangerous thing for him right now; and 3) that his spirits will remain high and optimistic. It helps that my Dad is a natural optimist, he's awesome like that, we just want to keep him focused on the positive, hopeful things.
We feel your prayers my friends, and know that you are standing with us in faith! I am thanking God for you every day!

Now, for my promise - I am headed down into the studio now to stamp for the first time in over a week. My mojo was simply non-existent these past days, but I'm determined to put stamp to ink to paper and create again. So, I PROMISE that I'll have something pretty to share with you later today. Keeping my promise will force me to stamp and not just stare at the table.

Stamped blessings to you all!!! Here's another video that spoke to me this past week - I hope it blesses you today too! There are no pictures, just words - but as you listen and follow along, I pray that you'll see the love of Jesus in them and feel his presence with you.
~~Robin