Pages

Showing posts with label #robinmerriman. Show all posts

Wednesday, September 5, 2018

Stamping Techniques 101 Blog Hop - Chalkboard Technique


Hello! I hope you're enjoying this month's Stamping Techniques Blog Hop - so many wonderful projects with the Chalkboard technique, a classic!

Here is a photo of my project:
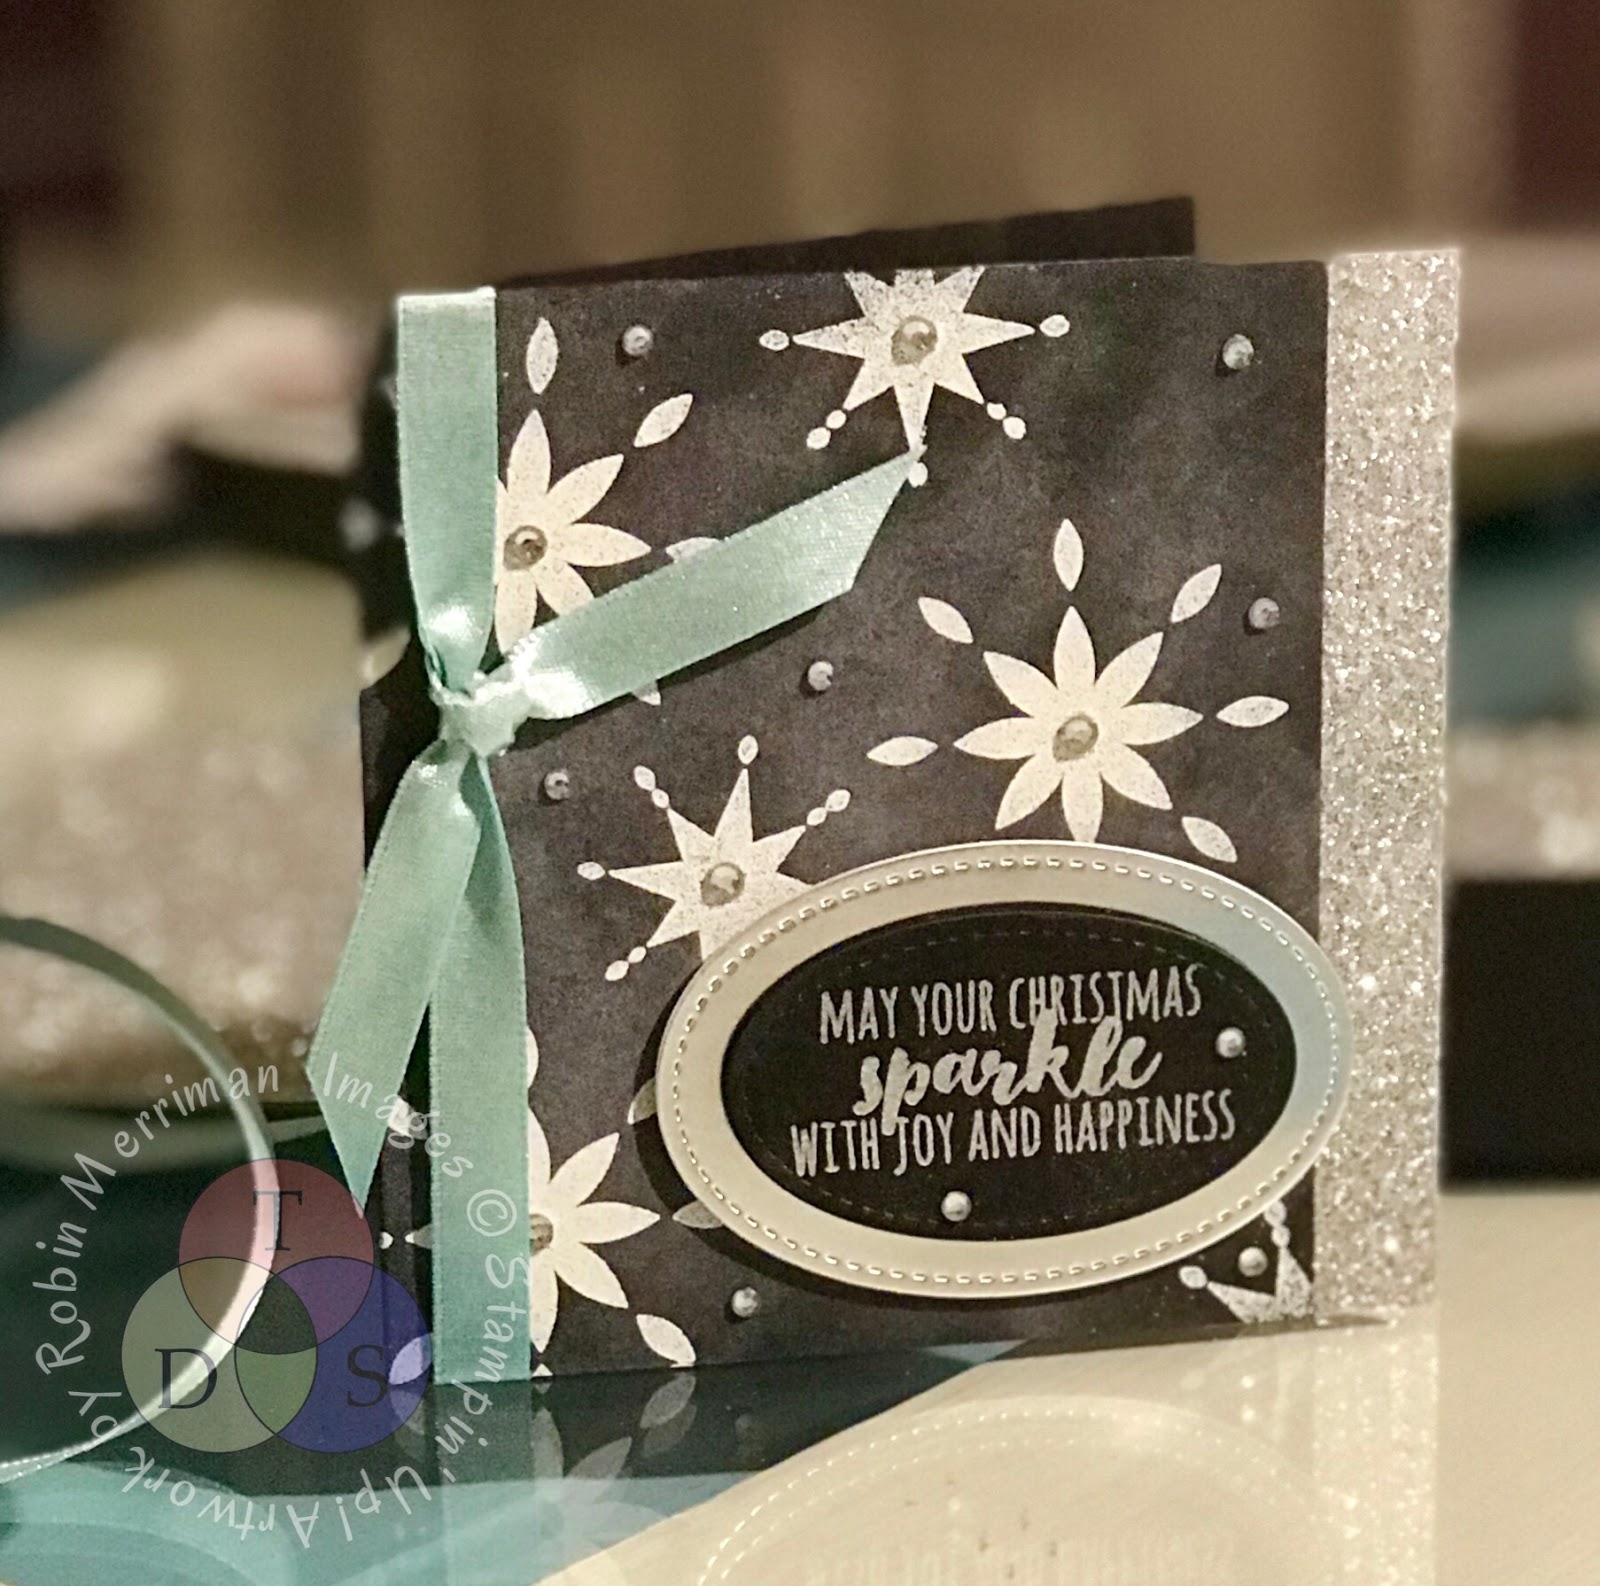

The Chalkboard technique is one of my favorites - I adore projects done with this eye-catching, yet simple style. This time, I'm thinking ahead to Christmas time and went with a more contemporary style. 

My Basic Black card base is cut at 4 1/4" x 8 1/2", folded in half to make a 4 1/4" square card. 
I trimmed 1/2" off the front right edge so I could add the strip of Silver Glimmer Paper at the end. 

There are several different ways to do this technique, I opted for the simplest - rubbing the Embossing Buddy across the black cardstock. 
Seriously, it's that simple. 


Before I do any stamping, I drop the Embossing Buddy onto the cardstock which produces a small dust cloud of white 'stuff' - whatever it is that's in that little sack. 
Then, I rub the Embossing Buddy around on the card front, tapping at times to produce more dust. It gives a look just like a schoolroom chalkboard. 

I stamped my images in Whisper White Craft Ink and embossed with White Embossing Powder. (Full confession here - my white embossing powder is a little old and isn't as brilliant as I'd prefer - you may have different results depending on the white level of your powder.)

Tip #1 - Don't be shy about adding more dust from the Embossing Buddy once the images are embossed. Sometimes it takes a few applications to produce the chalky finish you are looking for. 

Tip #2 - Be sure to have clean, oil free hands when doing this technique. Any oil or grease (hand cream for example) on your hands will come off on the cardstock and you WILL see the spots. 


I completed my card today with a greeting stamped in Versamark and embossed with Silver. I layered it onto a piece of Silver Foil Paper, using Stampin' Dimensionals under each layer. The layers were cut out with the Stitched Shapes Framelits and my Big Shot.

The ribbon side tie is the Pool Party 3/8" Shimmer Ribbon simply wrapped around the card front and tied off in a knot. I added some Clear Rhinestone Jewels for a sparkly finishing touch. 

I really hope you give this fun and easy technique a try for yourself! 

Here's a few of the products I've used for today's card: 
#142110 - Star of Light Photopolymer Stamp Set
#142049 - Christmas Pines Photopolymer Stamp Set
#103083 - Embossing Buddy
#109132 - White Embossing Powder


#147277 - Whisper White Craft Pad

#144152 - Pool Party Shimmer Ribbon

#145372 - Stitched Shapes Framelits
To purchase any of these supplies and more, you can visit my Online Store at this link:

www.trinitydesignstudio.stampinup.net
Thanks for stopping by! Be sure to visit the other hoppers blogs and see the fun projects they've created for you! 


Wednesday, January 3, 2018

Stamping Techniques 101 Blog Hop - Stampin' Blends


Hello and welcome! 
I'm happy to share the news that I've been invited to join a fun blog hop comprised of some stellar Stampin' Up! demonstrators from across the globe. The first Wednesday of each month, we'll be bringing you creative ideas that focus on simple, basic techniques; how-to's and design basics. 
Creativity is for everyone - no matter how seasoned a crafter you may be! 

If you are taking the January 2018 hop in order, you will have arrived here from the talented Pam Jorgensen's blog. 

This month, we are focusing on the use of the Stampin' Blends alcohol markers. These markers are really wonderful coloring tools. They make it easy to achieve realistic looking images with rich depth of color

Here's my card project for this month:


You should know first of all that coloring is NOT my specialty! 
I've always said I am a lazy stamper, and I've always gotten frustrated when it came to coloring - lets just say I didn't think too highly of coloring books when I was growing up. :)
BUT...I've had a blast playing and coloring with the new Stampin' Blends! Being able to add layers of color without making a big, blotchy mess is awesome and the Blends make it super easy. 


For this card project, I stamped the image using Tuxedo Black Memento Ink, the recommended ink for use with the Stampin' Blends. 
Tip #1 - allow to dry completely before coloring in the image to help prevent bleeding OR do what I did and heat set the ink using your Heat Tool. (I'm lazy AND impatient! Ha!)

Then, I just chose my colors and began to color in the images! 
For the little piggies on the background piece, I colored their bodies with the Ivory Skin Tone blend, mainly because I couldn't find my Crumb Cake ones - grrr....
I deliberately added more color on their bellies and in a few splotches on their bodies -they are pigs after all. Ears and noses and tails and hooves were colored in with the light Pink Pirouette marker.
Tip #2 - I learned pretty quickly to NOT color all the way up to the inside edge of the image. If you do, you risk the ink color spreading beyond the edge. If you look really closely at my card, you can see evidence of that, but it wasn't awful and I was like "It's handmade, might as well look like it!"
For the wings, I colored even further back from the edge, but this was to leave more of the white showing on purpose. I did add some Clear Wink of Stella to the wings for some shimmer, but it's hard to photograph well - it's there though, promise!

The focal piggy is colored in entirely with the Light Pink Pirouette blend adding more color where you see darker patches. 

Honestly friends, I'm never gonna be a master watercolorer, but the Stampin' Blends helped me create a sweet card with some pretty realistic colored images - and if I can do it, anyone can!
Plus, it made me smile, which is the most important thing anyway, right? :)


One more thing:
Tip #3 - I cut my stamp apart into two images, separating the greeting from the piggy image. That made it easier for me to stamp the piggy randomly. Don't be afraid to customize your stamp images - they're yours! Make them work for YOU!

Well, you made it this far - thanks! 
Next up is the lovely and talented Tamra Davis - click on the 'next blog' picture below to visit her blog. 


Here's the entire line up for the Blog Hop:
Stamping Techniques 101 – January Blog Hop – Stampin Blends 
Here are a few of the supplies I used to create this card - 

This Little Piggy - 143922
Thick Whisper White Cardstock - 140272

Pink Pirouette Light Stampin' Blend - 144593
Ivory Stampin' Blend - 144606
Smoky Slate Light Stampin' Blend - 145054
Cookie Cutter Builder Punch - 140396 (used for the iridescent glimmer paper embellishments!)
Bunch of Banners Framelits - 141488
Layering Circles Framelits - 141705

You can shop online 24/7 in my Online Store - just click the icon below!


Wednesday, September 2, 2015

Wonderland Christmas in White and Gold

So, yesterday we FINALLY got to share the New Stampin' Up! Holiday Catalog with everyone - 
those of us who are demonstrators with SU! have been literally drooling over the selection of products available since our Convention in mid-July. 

We've also been pretty much buying everything between the catalog covers, so we're eating a lot of Ramen these days. Just so we can play with all the new crafty toys and create ourselves silly. 
Kind of like being in college again, which is appropriate since it's 'back-to-school' time for all of us. :)

I can hear the grocery store clerks now, "Here come those poor Stampin' Up! demonstrators again, carts full of Ramen Noodles. Must be new Catalog time...." Hehehe...

Now it's your turn. :) 
Seriously...
Someone please tell me how you can resist this:


White and Gold and Vellum and clean simplicity - 
Stunning! 

This is the Wonderland stamp set and I honestly could. not. stop. creating with it. 
Here. See for yourself how awesome these images are: 


Ya'll....those trees....
and the font for the words. 
So. much. love.
Boom.

Anyway, today I thought I'd share one of the several cards I created with this set. Actually, I made this card 3 ways, using different gold for the mat layer. 
Here's two of them: 


The card on the left uses the Gold Glimmer Paper for the mat. The one on the right uses the Gold Fancy Foil Designer Vellum. 
Here's a close up of that one: 


I created the third version using the Gold Foil Sheets, but I forgot to take a picture of it before I mailed it off for the card swap I was in.  :(
Sorry 'bout that. 

All the cards are the same design. I used Whisper White card stock for the base and stamped layers, Vellum card stock for the accent piece and the New Gold Cording and Woodland Textured Impressions Embossing Folder from the Holiday Catalog. The shapes are cut with my Big Shot and the Lots of Labels Framelits. 


We're gonna be making this card at my Christmas in September Stamp-a-Stack 
on Sept. 28th here in the studio. 
But I know a lot of you can't come to a class here, so I'm gonna offer a Class-to-Go option too. 
There will be three different cards to choose from - you'll get supplies to make 10 total from the 3 designs. Details coming soon, so stay tuned! 

In the meantime, here's a supply list of what I used to create today's cards: 

Built for Free Using: My Stampin Blog


All you need to do to purchase from my supply list is click on any of the above thumbnail photos of the products. You'll go straight into my Online Store and be able to fill your cart and check out from there! 
In the meantime, I need to run to the store. 
We ran out of Ramen last night. ;)


Stampin' Up! demos are going hungry today. Tragic.
But at least they still have stamps, ink and their Big Shots. 

Sunday, August 31, 2014

Project Life by SU for You Blog Tour - #PLxSU4U

Happy Last Day of August!
Welcome to month #2 of the Oh Snap! Project Life Blog Tour. (#PLxSU4U)

I've teamed up with my 2010 Advisory Board Sisters to bring you all a once a month Blog Hop that highlights all the different creative ideas we have for using Project Life.
Because it's so versatile, you can use it not only for memory keeping, but cards, traditional scrapbooking and your other paper crafting projects.
Look for this logo on the last day of each month and you'll know you've got great creative ideas at your fingertips!


You may have just come from my talented friend Jodi Reinert's blog. I'm sure she had something cute and cool to share with you. If you didn't see her project, you can click back by clicking on the icon below:
http://www.stampwithjodi.com/2014/08/project-life-by-stampin-up-another-blog-hop-.html

So, I told you guys last month that this would be my #yearoflivingawesomely (year of living AWESOMELY).
Because of the crazy busy schedule we've been keeping in our home this year, I knew I'd never be able to document it by scrapbooking the traditional way, so I chose Project Life to help me get it done.
Here is the next page in my 12 x 12 Project Life Album:


One of the things I love is the portability of Project Life.
The month of August flew by for us and I had to take my supplies on vacation with me to complete this page for our blog hop. Ya know what? It was SO easy!
The beauty of this system is that you don't need a ton of supplies to document the important moments in your life.
This next page in my #yearoflivingawesomely book is all about our family Road Trips for my daughter's ice skating team, the National Blades. Kind of ironic that I was on another family road trip when I created it, huh? :)


The photo above is simply showing photos and Project Life cards inserted into the 12 x 12 pocket page. The only embellishments I added were the star and heart stickers that are included in the Accessory Pack. I used the Project Life Journaling Pens to write my commentary - love how precise they are.

This next picture shows the only thing I did uniquely on this layout:


I used one of the clear/colored embellishment punch outs and one of the wood arrows on the outside of my layout to highlight my travel coffee cup in the photo. So easy to add with some Glue Dots.


Even with a memory keeping system as simple as Project Life, you can think outside the "page" and be as creative as you wish. Love that!

Your next stop on the tour is my good friend Stella MacKay's blog. I think she has a little something different and cool to show you today - don't miss it!
http://www.stellarstamps.com/stampin_and_scrappin_up/2014/08/project-life-by-su-stampin-up-for-you-blog-tour-using-a-piece-of-a-card-collection-to-make-a-card.html

Here's the info on some of the products I've used on today's project:


You can place your order in my Online Store for all of these and more Project Life Assortments - including a smaller, 6 x 8 album if you don't want to go for the gusto with a 12 x 12. 
Click this icon to visit my online store today:


http://www.stampinup.com/ECWeb/ItemList.aspx?categoryid=1800&dbwsdemoid=112744

Thanks so much for stopping by our Blog Hop today - I hope you've been inspired to do some memory keeping of your own.
Let me know how I can help you!


Happy Creating!
~~Robin