Pages

Showing posts with label #trinitydesignstudio. Show all posts

Wednesday, September 5, 2018

Stamping Techniques 101 Blog Hop - Chalkboard Technique


Hello! I hope you're enjoying this month's Stamping Techniques Blog Hop - so many wonderful projects with the Chalkboard technique, a classic!

Here is a photo of my project:
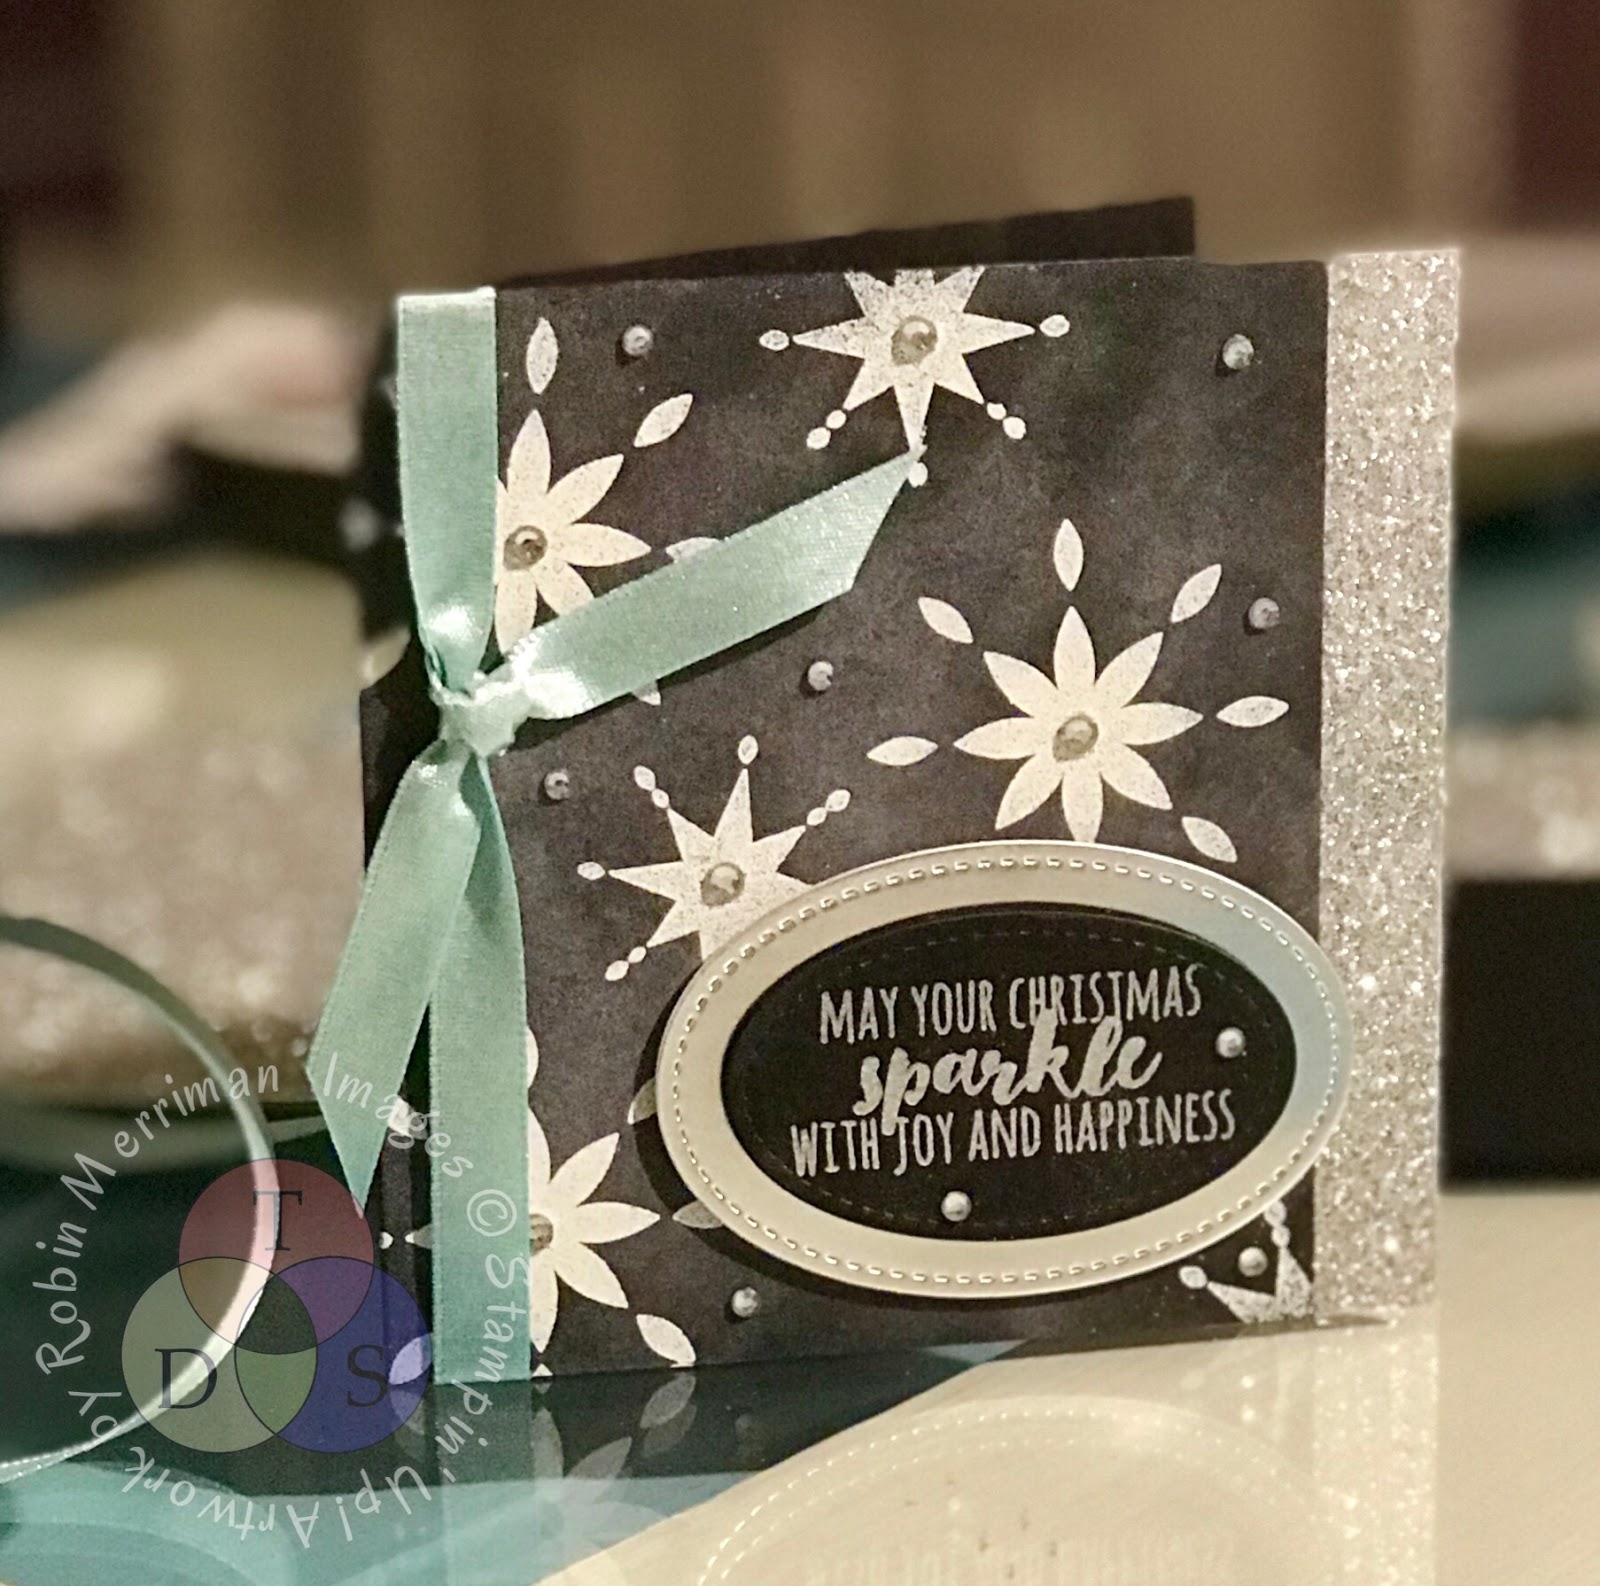

The Chalkboard technique is one of my favorites - I adore projects done with this eye-catching, yet simple style. This time, I'm thinking ahead to Christmas time and went with a more contemporary style. 

My Basic Black card base is cut at 4 1/4" x 8 1/2", folded in half to make a 4 1/4" square card. 
I trimmed 1/2" off the front right edge so I could add the strip of Silver Glimmer Paper at the end. 

There are several different ways to do this technique, I opted for the simplest - rubbing the Embossing Buddy across the black cardstock. 
Seriously, it's that simple. 


Before I do any stamping, I drop the Embossing Buddy onto the cardstock which produces a small dust cloud of white 'stuff' - whatever it is that's in that little sack. 
Then, I rub the Embossing Buddy around on the card front, tapping at times to produce more dust. It gives a look just like a schoolroom chalkboard. 

I stamped my images in Whisper White Craft Ink and embossed with White Embossing Powder. (Full confession here - my white embossing powder is a little old and isn't as brilliant as I'd prefer - you may have different results depending on the white level of your powder.)

Tip #1 - Don't be shy about adding more dust from the Embossing Buddy once the images are embossed. Sometimes it takes a few applications to produce the chalky finish you are looking for. 

Tip #2 - Be sure to have clean, oil free hands when doing this technique. Any oil or grease (hand cream for example) on your hands will come off on the cardstock and you WILL see the spots. 


I completed my card today with a greeting stamped in Versamark and embossed with Silver. I layered it onto a piece of Silver Foil Paper, using Stampin' Dimensionals under each layer. The layers were cut out with the Stitched Shapes Framelits and my Big Shot.

The ribbon side tie is the Pool Party 3/8" Shimmer Ribbon simply wrapped around the card front and tied off in a knot. I added some Clear Rhinestone Jewels for a sparkly finishing touch. 

I really hope you give this fun and easy technique a try for yourself! 

Here's a few of the products I've used for today's card: 
#142110 - Star of Light Photopolymer Stamp Set
#142049 - Christmas Pines Photopolymer Stamp Set
#103083 - Embossing Buddy
#109132 - White Embossing Powder


#147277 - Whisper White Craft Pad

#144152 - Pool Party Shimmer Ribbon

#145372 - Stitched Shapes Framelits
To purchase any of these supplies and more, you can visit my Online Store at this link:

www.trinitydesignstudio.stampinup.net
Thanks for stopping by! Be sure to visit the other hoppers blogs and see the fun projects they've created for you! 


Monday, January 8, 2018

Paper Pumpkin Meets Memories and More

So, I've made a few discoveries since I've gotten back to blogging. Such as discovering some creative projects that I'd uploaded into blog posts and never shared! 
I've got about 5 or 6 projects just hanging out in 'draft' status, and even though some of the products I used may not be available anymore, I figured a good idea is always a good idea, right? 

First up is a scrapbook page I created from my daughter's 2nd Senior Portrait session. 
Like I said, it's been awhile - she's a sophomore in college now. Lol!


This page was created obviously when SU! still was in partnership with Becky Higgins and Project Life, but happily, we still carry a solid Variety Pack of 12" x 12" Photo Pocket Pages for the Memories and More line. And I 💖  the Black Faux Leather Album that we carry! 
Even better news is that there are still some of the Pocketful of Cheer Refill Kits available to any of you that are Paper Pumpkin subscribers. 😃 I've linked the photo to my website for you. 


Here are a few close up photos of different parts of the page: 
I love the little pockets, perfect for some sweet fillers and embellishments. 


Even though we did the photo shoot on the outdoor ice rink in our town - on a FREEZING cold day in February, the colors of this kit were perfect for the photos. Bright and cheery like her sweater and the beautiful Winter sky. 
Even though Emma has retired from skating (knee injuries don't mesh well with collegiate skating...) she still has her skates and her love of the sport. 
Oh, and so far, she's kept the boyfriend too. LOL! 2 years and counting...


I wanted to point out the green pearl embellishments. I actually colored those with a sharpie marker to make them match, but it was a pain to get the right color depth. Now that we have Stampin' Blends, it'll be much easier to customize your pearls and rhinestones. 


I know you're wondering what stamp set I used for the stamped pieces - and I honestly don't remember. I'm old and that was a LONG time ago! It was probably the stamp set that came with the Pocketful of Cheer Paper Pumpkin kit, but you can use whatever stamp set you like on your page, right? 


There you have it - Paper Pumpkin meets Memories and More. 
Just a year or so later than I'd planned. 😉

You can shop the entire Memories and More line on my website, just click the icon below: 


I'd love to hear from you so leave a comment to say "Hi!". 
Happy Monday everyone! 


Wednesday, January 3, 2018

Stamping Techniques 101 Blog Hop - Stampin' Blends


Hello and welcome! 
I'm happy to share the news that I've been invited to join a fun blog hop comprised of some stellar Stampin' Up! demonstrators from across the globe. The first Wednesday of each month, we'll be bringing you creative ideas that focus on simple, basic techniques; how-to's and design basics. 
Creativity is for everyone - no matter how seasoned a crafter you may be! 

If you are taking the January 2018 hop in order, you will have arrived here from the talented Pam Jorgensen's blog. 

This month, we are focusing on the use of the Stampin' Blends alcohol markers. These markers are really wonderful coloring tools. They make it easy to achieve realistic looking images with rich depth of color

Here's my card project for this month:


You should know first of all that coloring is NOT my specialty! 
I've always said I am a lazy stamper, and I've always gotten frustrated when it came to coloring - lets just say I didn't think too highly of coloring books when I was growing up. :)
BUT...I've had a blast playing and coloring with the new Stampin' Blends! Being able to add layers of color without making a big, blotchy mess is awesome and the Blends make it super easy. 


For this card project, I stamped the image using Tuxedo Black Memento Ink, the recommended ink for use with the Stampin' Blends. 
Tip #1 - allow to dry completely before coloring in the image to help prevent bleeding OR do what I did and heat set the ink using your Heat Tool. (I'm lazy AND impatient! Ha!)

Then, I just chose my colors and began to color in the images! 
For the little piggies on the background piece, I colored their bodies with the Ivory Skin Tone blend, mainly because I couldn't find my Crumb Cake ones - grrr....
I deliberately added more color on their bellies and in a few splotches on their bodies -they are pigs after all. Ears and noses and tails and hooves were colored in with the light Pink Pirouette marker.
Tip #2 - I learned pretty quickly to NOT color all the way up to the inside edge of the image. If you do, you risk the ink color spreading beyond the edge. If you look really closely at my card, you can see evidence of that, but it wasn't awful and I was like "It's handmade, might as well look like it!"
For the wings, I colored even further back from the edge, but this was to leave more of the white showing on purpose. I did add some Clear Wink of Stella to the wings for some shimmer, but it's hard to photograph well - it's there though, promise!

The focal piggy is colored in entirely with the Light Pink Pirouette blend adding more color where you see darker patches. 

Honestly friends, I'm never gonna be a master watercolorer, but the Stampin' Blends helped me create a sweet card with some pretty realistic colored images - and if I can do it, anyone can!
Plus, it made me smile, which is the most important thing anyway, right? :)


One more thing:
Tip #3 - I cut my stamp apart into two images, separating the greeting from the piggy image. That made it easier for me to stamp the piggy randomly. Don't be afraid to customize your stamp images - they're yours! Make them work for YOU!

Well, you made it this far - thanks! 
Next up is the lovely and talented Tamra Davis - click on the 'next blog' picture below to visit her blog. 


Here's the entire line up for the Blog Hop:
Stamping Techniques 101 – January Blog Hop – Stampin Blends 
Here are a few of the supplies I used to create this card - 

This Little Piggy - 143922
Thick Whisper White Cardstock - 140272

Pink Pirouette Light Stampin' Blend - 144593
Ivory Stampin' Blend - 144606
Smoky Slate Light Stampin' Blend - 145054
Cookie Cutter Builder Punch - 140396 (used for the iridescent glimmer paper embellishments!)
Bunch of Banners Framelits - 141488
Layering Circles Framelits - 141705

You can shop online 24/7 in my Online Store - just click the icon below!


Friday, April 22, 2016

Soft and Sweet Floral Thank You

Last week, many of my stampin' friends gathered in locations all over the globe for the Stampin' Up! On Stage events. 
Unfortunately, I wasn't able to attend this time - just way too much going on here with family - BUT, my swaps made the journey and were traded out for some gorgeous cards! 


Two of our awesome Advisory Board Alumni planned a group dinner and card swap and I was so happy to be able to participate long distance. 
The theme for our swap was Thank You cards - which we all need. 
I'll be sharing some of the lovely cards I received in return here on the blog, so stay tuned! 

Here's a supply list for my card so you can recreate it at home: 


There aren't any tips or tricks to this one - it's just basic layering - I know you can do it! 

Good to see you back here today - have you been stamping this week? 
I sure hope so - you NEED your creating time! 


Wednesday, April 20, 2016

Clean and Simple Circles Card

Last month, I needed to create a bunch of cards for some special people so I went the clean and simple route with a touch of glam: 


The green palette was inspired by the month (March), the holiday (St. Patrick's Day), and a photo of multiple greens I saw online. 

Lots of great inspiration I'd say.... 

Once again - a pretty straightforward card - 2 punches, one greeting, card stock scraps - easy-peasy! 
The one trick you need to know is to adhere your center circles down first. 
When you place the others, they will hang over the edge a bit, just take your Paper Snips and trim to the edge of the card sides. 

So, here's a supply list for you:


The best part of this card is that you can take the simple design and re-create it in any color combo, with any greeting for ANY occasion. 
Ya gotta love multi-tasking... :)

So glad you stopped by today - now, go create something fun! 


Tuesday, April 19, 2016

Sweet Circles Hello Card

I have to say it - 
this card makes my heart SO happy!!

It's fun and sparkly and floral and layered and embellished and just super girly
and I LOVE it! 


There is a Whole LOT going on with this card, but honestly, 
it was super simple to create. 
Assemble it in 'layers' - it's like building blocks:
a) card base; b) solid circles; c) embossed strip; d) circle rings; e) stamped circle; f) buttons; g) greeting. 

The Circles Framelits made it easy to cut the 'rings' - here's how I did it: 
1) You need 2 Circle Framelits that are only one size difference from the other. (If you're counting from the middle of the framelit set - I used the 3rd, 4th and 5th for the two 'rings' on this card.)


2) For my Blushing Bride circles, I used the two smaller framelits (3 and 4). I placed both framelits on the paper and ran them through the Big Shot. This created the solid inner circle and the 'ring'. 
(This photo example is on different designer paper.)


I simply repeated this, using the two larger framelits (4 and 5) for the larger 'ring' and solid circle. 
You can create a similar look with Circle punches too. 

3) The Pink Pirouette card stock strip was embossed with the Lovely Lace embossing folder and is popped up on Stampin' Dimensionals as is the stamped floral circle. 

4) The two paper 'rings' and the hello greeting were adhered with the Fine Tip Glue Pen and I used Glue Dots to adhere the buttons. 

5) The twine in the smaller Vintage Faceted Button is a strand from a length of the White Jute Ribbon, pulled out and tied through the button. 

As a final touch, I painted the flower with the Clear Wink of Stella - such a lovely touch. 

Here's a complete supply list for you: 


Don't ever look at a card and say "I can't do that!" 
Because you can! 
Most of the time, a fancy, layered card just needs to be broken down and built - think of it as legos for paper crafters. :)

Thanks for stopping by today - don't forget, the Lost Lagoon card stock is on it's way out - hopefully it's not sold out already....If you love it, you might want to shop for some before it's gone, gone, gone. 
Click on any of the product photos above to visit my Online Store and shop today! 


Monday, April 18, 2016

You're My Anchor Encouragement Card

I don't know about you all, but I sometimes struggle with "Guy" cards. 
True story. 
It's not that I don't like creating them, but for this gal who loves all things girly, it's just hard to get in that man-style creative groove. Can you relate? 

I can tell you what helps tho' - having a stamp set to work with that has strong images and (bonus!) great co-ordinating graphics. 
Guy Greetings to the rescue: 


This card is pretty straightforward - 3 colors, simple stamping and layering, minimal embellishments. 
Keeping it clean and simple is sometimes the best way to go for "Guy" cards.
Yeahhh.....not a whole lot of guys can appreciate a sweet lace ribbon or vintage button....

So, here's a supply list for you AND because I'm good like this - a FREE, printable tutorial. 


To order any of the supplies listed, simply click on one of the product photos and you'll be taken right into my Online Store to shop! 
(The Washi Label Punch is Sold Out and is retiring, but the greeting is easily hand-cut or you can use the Bitty Banners Framelits)

Click the link below for the FREE, Printable Tutorial:

Thanks for stopping by - I hope you get sometime to get crafty with your stamps and ink today!


Monday, March 21, 2016

Traveler - Inspiration Series - Camera Card

Well folks - this is it! 
Last day of the Traveler stamp set Inspiration Series. It seems appropriate to end with a Graduation card, don't ya' think? 
We're all gonna need a couple grad cards coming up soon - I know with Emma's high school graduation this June, I'll need more than a few for her friends. This card is a great one for the guy grads - and super simple to create too. 


The style is called a 'gatefold' card because the front opens up like a gate. It's easy to achieve the fold, simply score at 2 1/8" from each end of a piece of 5 1/2" x 8 1/2" card stock and fold the flaps in towards the center. The focal image layers are attached to just one side of the fold. Easy!

Here's a couple tips for this particular card:
1) I stamped the suitcase in a random pattern on the front prior to dry embossing the flaps with the Modern Mosaic embossing folder in the Big Shot. 
2) the focal layers are attached with Stampin' Dimensionals to allow for the thickness of the ribbon. I just like it to lay right, ya' know? 
3) The black layer is popped up on dimensionals too - just because. I like the depth they add to a card and tend to use them like candy...

Anyway, here's a complete supply list for you:


Shopping for any of these products and more is so easy, simply click on any of the product photos and it will take you right into my Online Store. 
Be sure to check out the Clearance Rack and Weekly Deals while you are there and remember - all orders of $50 or more automatically earn you a choice of a FREE Sale-A-Bration product! (but just through the 31st!)

I hope you've enjoyed this series - is there a stamp set you'd like to see some ideas for? 
Leave me a note in the comments and if I own it, I'll consider it for my next inspiration series!


I probably should remind you about the soon-to-be retired In Colors.
All 5 of the 2014-16 In Colors will be retiring at the end of May. 
What that means, practically speaking, for you is - 
the products using these 5 colors will SELL OUT - and Soon! 
I just look at past years sales history to speak from experience. 
My suggestion is to take a peek at what you own now and STOCK UP if there are any you will be sad to see go. 
You especially want to grab a couple of ink refills for your ink pads so you can keep using them for years to come. 
Here's a little graphic to help re-familiarize you with the colors: 


You can place your order online at 

Have an awesome Monday everyone!